篇首语:本文由编程笔记#小编为大家整理,主要介绍了SpringCloud Stream消息驱动设计思想以及整合rabbitmq消息队列案例--学习笔记相关的知识,希望对你有一定的参考价值。
参见 RabbitMQ的安装和配置https://blog.csdn.net/weixin_43025151/article/details/123186641
RabbitMQ启动成功:

一个标准的消息队列MQ,如下图:

为什么用CloudStream?
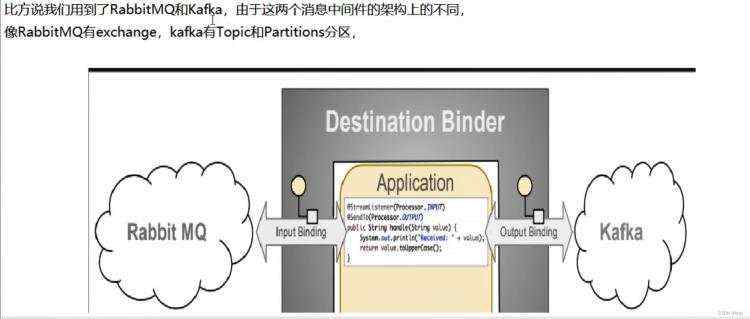

一句话:CloudStream屏蔽底层消息中间件的差异,降低切换成本,统一消息的编程模型!


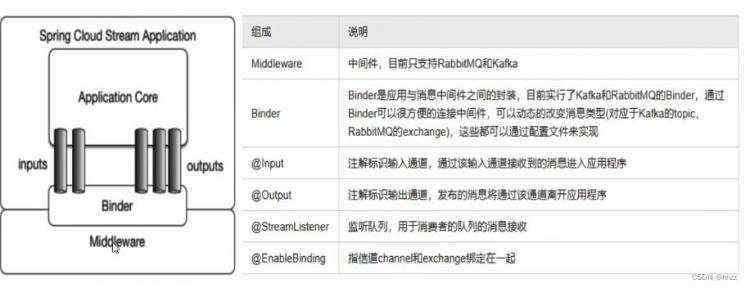
绑定器Binder:INPUT适用于消费者 OUTPUT适用于生产者
Stream中的消息通讯方式遵循了发布-订阅模式 Topic主题进行广播 在RabbitMQ就是Exchange 在Kafka中就是Topic。
pom文件代码
xsi:schemaLocation="http://maven.apache.org/POM/4.0.0 http://maven.apache.org/xsd/maven-4.0.0.xsd">
<mysql.version>5.1.47
cloud-eureka-server7001
项目结构&#xff1a;
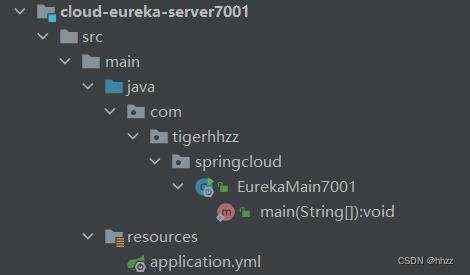
项目main入口方法&#xff1a;
package com.tigerhhzz.springcloud;
import org.springframework.boot.SpringApplication;
import org.springframework.boot.autoconfigure.SpringBootApplication;
import org.springframework.cloud.netflix.eureka.server.EnableEurekaServer;
/**
* &#64;author tigerhhzz
* &#64;date 2022/6/13 10:33
*/
&#64;SpringBootApplication
&#64;EnableEurekaServer
public class EurekaMain7001
public static void main(String[] args)
SpringApplication.run(EurekaMain7001.class,args);
pom.xml
xsi:schemaLocation&#61;"http://maven.apache.org/POM/4.0.0 http://maven.apache.org/xsd/maven-4.0.0.xsd">
application.yml
server:
port: 7001
spring:
application:
name: cloud-eureka-server7001
eureka:
instance:
hostname: eureka7001.com
client:
register-with-eureka: false # 表示不向注册中心注册
fetch-registry: false # 由于注册中心的职责就是维护服务实例&#xff0c;所以它不需要去检索服务
service-url:
#defaultZone: http://eureka7002.com:7002/eureka/ #集群 指向其他eureka
defaultZone: http://eureka7001.com:7001/eureka/ #单机 指向自己
server:
enable-self-preservation: false #关闭自我保护机制 &#xff0c;保证不可用服务被及时剔除
目录结构&#xff1a;
module:cloud-stream-rabbitmq-provider8801
pom.xml
xsi:schemaLocation&#61;"http://maven.apache.org/POM/4.0.0 http://maven.apache.org/xsd/maven-4.0.0.xsd">
application.yml
server:
port: 8801
spring:
application:
name: cloud-stream-privider
cloud:
stream:
binders: #自此处配置要绑定的rabbitmq的服务信息
defaultRabbit: #表示定义的名称&#xff0c;用于binding整合
type: rabbit #消息组件类型
environment: # 设置rabbitmq的相关的环境配置
spring:
rabbitmq:
host: localhost
port: 5672
username: guest
password: guest
bindings: #服务的整合处理
output: #这个名字是一个通道的名称
destination: studyExchange #表示要使用的exchange名称定义
content-type: application/json #设置消息类型&#xff0c;本次为json
binder: defaultRabbit #设置要绑定的消息服务的具体设置
eureka:
client:
service-url:
defaultZone: http://eureka7001.com:7001/eureka/ #http://localhost:7001/eureka/
instance:
lease-expiration-duration-in-seconds: 5 #如果现在超过了5秒的间隔
lease-renewal-interval-in-seconds: 2 #设置心跳的时间间隔
instance-id: send-8801.com
prefer-ip-address: true #访问的路径变为IP地址
主启动类
package com.tigerhhzz.springcloud;
import org.springframework.boot.SpringApplication;
import org.springframework.boot.autoconfigure.SpringBootApplication;
/**
* &#64;author tigerhhzz
* &#64;date 2022/6/18 10:00
*/
&#64;SpringBootApplication
public class StreamMQMain8801
public static void main(String[] args)
SpringApplication.run(StreamMQMain8801.class,args);
业务类–接口
package com.tigerhhzz.springcloud.service;
/**
* &#64;author tigerhhzz
* &#64;date 2022/6/18 10:01
*/
public interface IMessageService
public String send();
业务类–实现类
package com.tigerhhzz.springcloud.service.impl;
import cn.hutool.core.lang.UUID;
import com.tigerhhzz.springcloud.service.IMessageService;
import org.springframework.cloud.stream.annotation.EnableBinding;
import org.springframework.cloud.stream.messaging.Source;
import org.springframework.messaging.MessageChannel;
import org.springframework.messaging.support.MessageBuilder;
import javax.annotation.Resource;
/**
* &#64;author tigerhhzz
* &#64;date 2022/6/18 10:01
*/
&#64;EnableBinding(Source.class) //定义消息推送通道
public class MessageServiceImpl implements IMessageService
//消息发送通道
&#64;Resource
private MessageChannel output;
&#64;Override
public String send()
String serial &#61; UUID.randomUUID().toString();
output.send(MessageBuilder.withPayload(serial).build());
System.out.println("***********serial:"&#43;serial);
return serial;
controller层
package com.tigerhhzz.springcloud.controller;
import com.tigerhhzz.springcloud.service.IMessageService;
import org.springframework.web.bind.annotation.RequestMapping;
import org.springframework.web.bind.annotation.RestController;
import javax.annotation.Resource;
/**
* &#64;author tigerhhzz
* &#64;date 2022/6/18 10:05
*/
&#64;RestController
public class SendMessageController
&#64;Resource
private IMessageService messageService;
&#64;RequestMapping("/sendMessage")
public String sendMessage()
String send &#61; messageService.send();
return send;
8802基本和生产者8801的module一样
8802的配置&#xff1a;
server:
port: 8802
spring:
application:
name: cloud-stream-message-consumer
cloud:
stream:
binders: #自此处配置要绑定的rabbitmq的服务信息
defaultRabbit: #表示定义的名称&#xff0c;用于binding整合
type: rabbit #消息组件类型
environment: # 设置rabbitmq的相关的环境配置
spring:
rabbitmq:
host: localhost
port: 5672
username: guest
password: guest
bindings: #服务的整合处理
input: #这个名字是一个通道的名称
destination: studyExchange #表示要使用的exchange名称定义
content-type: application/json #设置消息类型&#xff0c;本次为json
binder: defaultRabbit #设置要绑定的消息服务的具体设置
eureka:
client:
service-url:
defaultZone: http://eureka7001.com:7001/eureka/ #http://localhost:7001/eureka/
instance:
lease-expiration-duration-in-seconds: 5 #如果现在超过了5秒的间隔
lease-renewal-interval-in-seconds: 2 #设置心跳的时间间隔
instance-id: receiver-8802.com
prefer-ip-address: true #访问的路径变为IP地址
8802的控制层&#xff1a;
package com.tigerhhzz.springcloud.controller;
import org.springframework.beans.factory.annotation.Value;
import org.springframework.cloud.stream.annotation.EnableBinding;
import org.springframework.cloud.stream.annotation.StreamListener;
import org.springframework.cloud.stream.messaging.Sink;
import org.springframework.messaging.Message;
import org.springframework.stereotype.Component;
/**
* &#64;author tigerhhzz
* &#64;date 2022/6/18 10:32
*/
&#64;Component
&#64;EnableBinding(Sink.class)
public class ReceiveMessageListenerController
&#64;Value("$server.port")
private String serverPort;
&#64;StreamListener(Sink.INPUT)
public void input(Message
System.out.println("我是消费者8802&#xff0c;-----》接受到的消息是&#xff1a;"&#43;message.getPayload()&#43;"\\t"&#43;serverPort);
依照8802&#xff0c;clone出来一份运行8803
依次启动rabbitmq
7001注册中心
8801消息生产模块
8802和8803消息消费模块
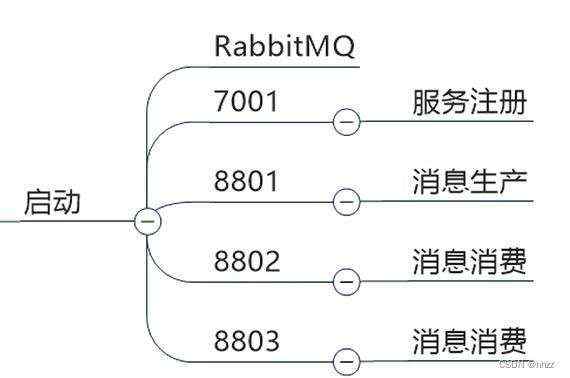
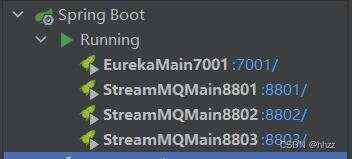
eureka7001注册中心

测试&#xff1a; 8801发送两条消息
http://localhost:8801/sendMessage
***********serial:76f1e833-100b-4d30-9423-4de0fad7e71e
***********serial:cfbcbed8-ba27-4036-8c5b-264a44cffea4
8802和8803分别接收到两条消息
我是消费者8802&#xff0c;-----》接受到的消息是&#xff1a;76f1e833-100b-4d30-9423-4de0fad7e71e 8802
我是消费者8802&#xff0c;-----》接受到的消息是&#xff1a;cfbcbed8-ba27-4036-8c5b-264a44cffea4 8802
我是消费者8803&#xff0c;-----》接受到的消息是&#xff1a;76f1e833-100b-4d30-9423-4de0fad7e71e 8803
我是消费者8803&#xff0c;-----》接受到的消息是&#xff1a;cfbcbed8-ba27-4036-8c5b-264a44cffea4 8803
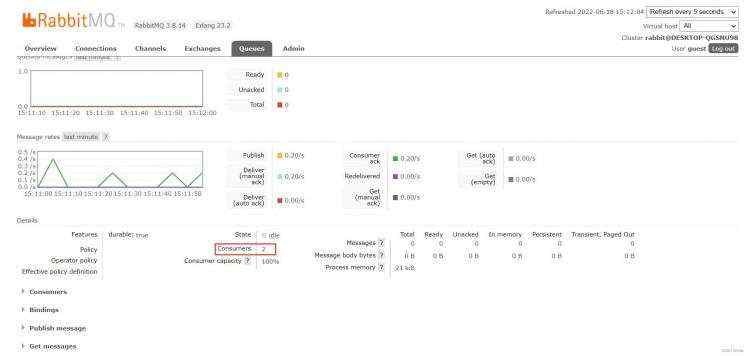
rabiitmq界面&#xff1a;

 京公网安备 11010802041100号 | 京ICP备19059560号-4 | PHP1.CN 第一PHP社区 版权所有